


I’ve been using Supabase as the backend for most of my projects. It is a superb service to work with once you manage to set it up correctly.
Getting everything up and running through the dashboard is straight forward and the docs are fairly up to date. But setting Supabase to run locally can be cumbersome.
I’m writing this small guide to help others avoid wasting a few hours of their time setting a local instance of supabase with external OAUTH providers.
I am using Google as my auth provider but what follows applies to all external providers.
Configure your local supabase instance
The first thing to do is, of course, to set up your local supabase instance.
If you need to install the supabase cli follow this guide.
Note, you’ll also need docker. I recommend running it using colima, instead of relying on the Docker Desktop app if you’re on macOS.
Now, the first thing to do is to setup supabase in your project.
Navigate to your project root and run:
supabase init
This will create a supabase dir with a config.toml file inside it. We’ll update this file in a second.
To check everything works, run supabase start. This should download all the required docker images and then deploy them.
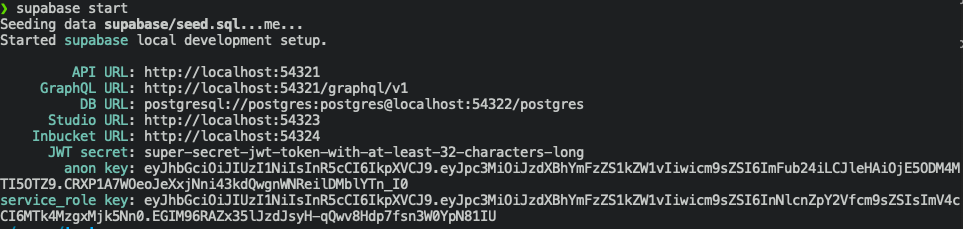
Copy the API URL (http://localhost:54321 in my case), we’ll need this soon.
Enable OAUTH Providers
Supabase docs just mention auth in passing by saying that you can enable oauth providers in the supbase/config.toml file as follows:
[auth.external.github]
enabled = true
client_id = ""
secret = ""
This gives us a hint but it is not enough as we’ll see.
Let’s open the supabase/config.toml file and add our external auth provider, you can copy the above snippet and add it to the file.
You’ll need to add your client_id and secret as you’d do for a normal supabase configuration.
The missing piece in the above snippet is the redirect_uri. Go ahead and add it using your API URL as the host.
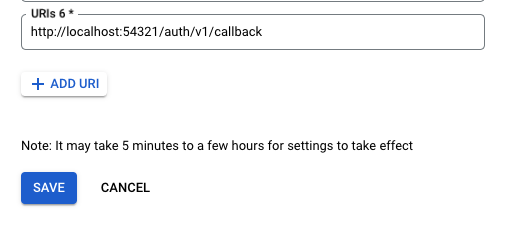
redirect_uri = "http://localhost:54321/auth/v1/callback"
Your entire provider config should look like this:
[auth.external.google]
enabled = true
client_id = "CLIENT_ID"
secret = "SECRET"
# Overrides the default auth redirectUrl.
redirect_uri = "http://localhost:54321/auth/v1/callback"
# Overrides the default auth provider URL. Used to support self-hosted gitlab, single-tenant Azure,
# or any other third-party OIDC providers.
url = ""
Now, either search or add the additional_redirect_urls entry in the config.toml file and add your redirect URI to it.
Mine ended up looking as follows:
additional_redirect_urls = ["https://localhost:3000", "http://localhost:54321"]
Finally run supabase stop && supabase start for supabase to load the new changes.
At this point the only thing left is to also add the redirect uri to our auth provider settings.
If you’re using Google Auth You need to navigate to APIs & Services >
Credentials and add a new Authorized Redirect URI to your desired
credential.
And that’s it!
Optimizations
As suggested in this GitHub
discussion you can make
your config.toml more secure by adding env() calls and a .env file to
your project’s root. This is left as an exercise to the reader.